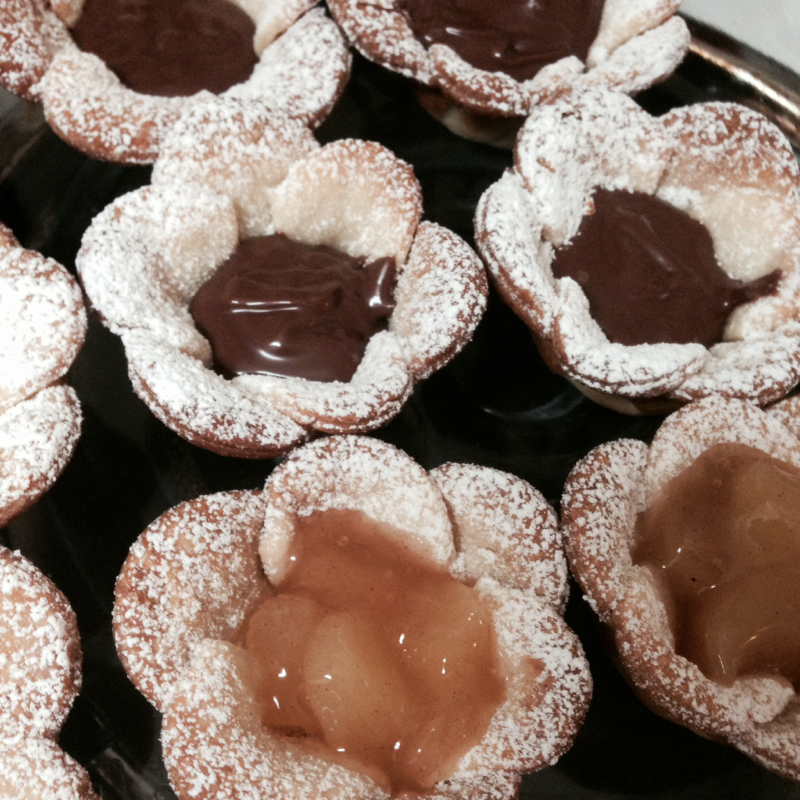
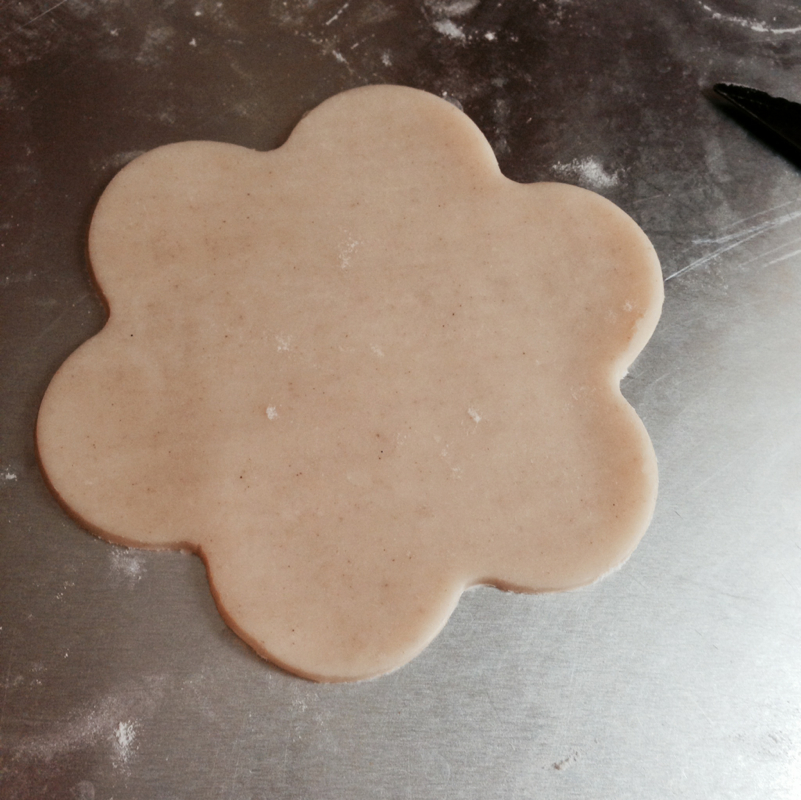
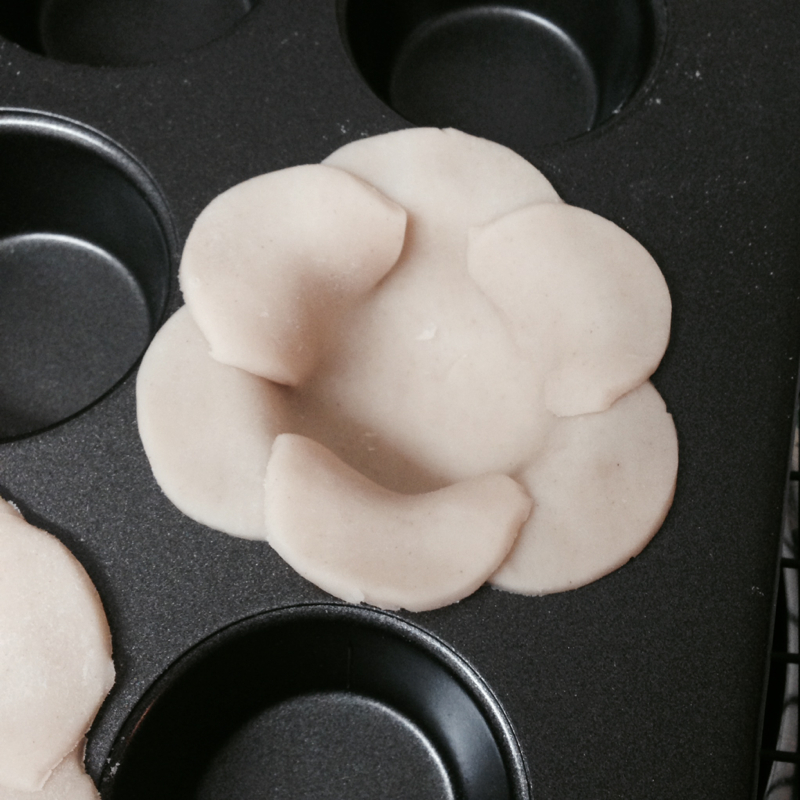
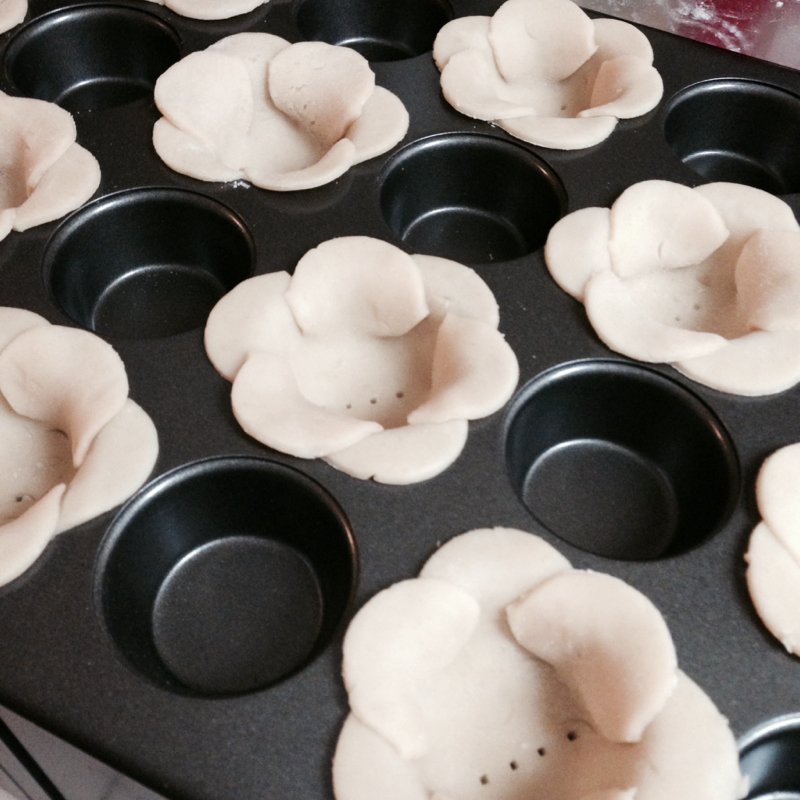
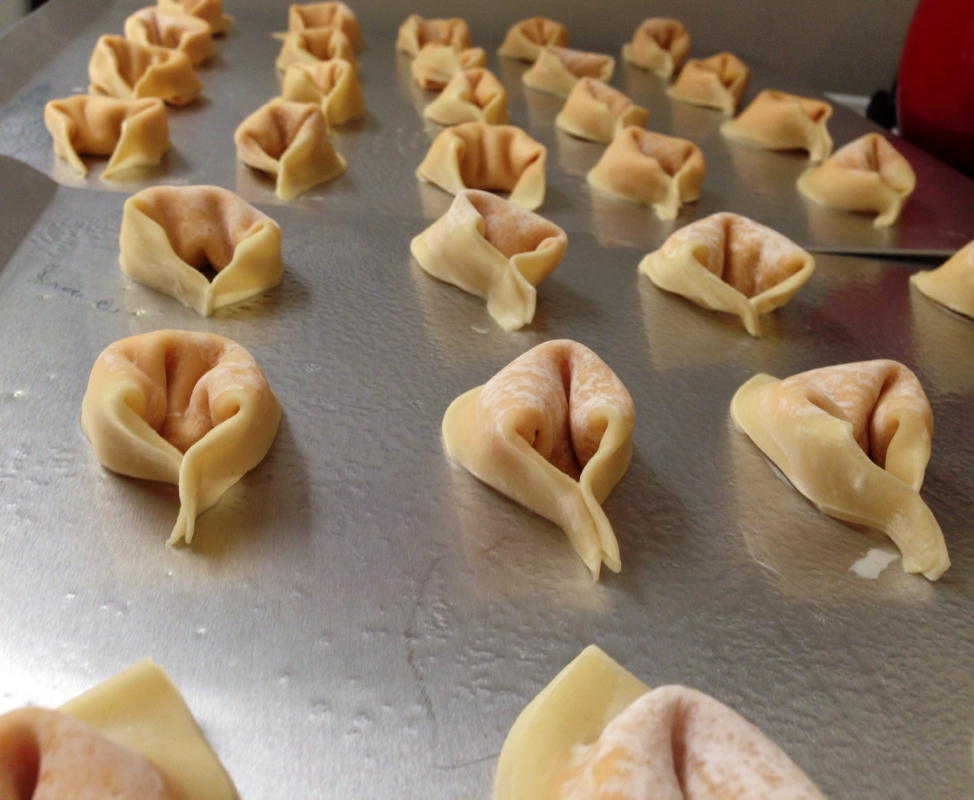
These tarts are EASY. Like really easy. Bite sized delicious pie. All of the ingredients in this recipe are STORE BOUGHT (I know that's cheating, but that's why this recipe is so quick!). Which means anyone can do it, but they look like they require real talent to pull off! I came up with this recipe after my gram passed away, because it was a time where no one wanted to cook, but we needed something to eat, these bite sized pieces of heaven did the trick. Plus I like to keep busy. Here's what you need: Ready to use pie crust (I like pillsbury) Powdered sugar Assorted pie fillings (I used apple, blueberry, and because I like chocolate I also used Hershey's chocolate spread) A large flower cookie cutter A mini muffin pan Directions (Preheat your oven according to the directions on the pie crust you bought!) 1) Remove your pie crust from the box and place it on a floured surface. Take your cookie cutter and cut as many flower shapes out as possible. (Save the extra dough, you can re-roll it out to 1/8th") Now because I wanted the flower petals to over lap, I used a small knife to cut an additional slice on each side of a petal. Make each slice about 1cm. That way every petal is individual. 2) Here is the only tricky part of this recipe. You need to layer this flower in your muffin pan delicately. Take every other petal and fold it in, then fold the other petals on top, place in a muffin slot. Take your top layer of petals and fold down around the top of the pan. Then take your second layer of petals and fold them over the other petals. At this point it should look like a flower. Like this: Your going to have to do every other muffin slot so that your petals do not get squished. The flower making gets to be a piece of cake by your third attempt. Which just means those first two are treats for you when they're done! 3) now here is the important part. Prick each flower with a fork so the air can escape. 4) bake those little darling according to the ready made pie crust. 5) once the crust is golden brown, they're done! Let them cool. Take some powder sugar and sprinkle around the petals of the flowers. 6) Now you can add any of your favorite pie fillings. (If you are adding the chocolate spread just warm it up in the microwave for a few seconds, it's easier to manipulate that way) You can also add some fun topping to this (ie: whipped cream to the chocolate, cinnamon or nutmeg to the apple etc.) Enjoy!
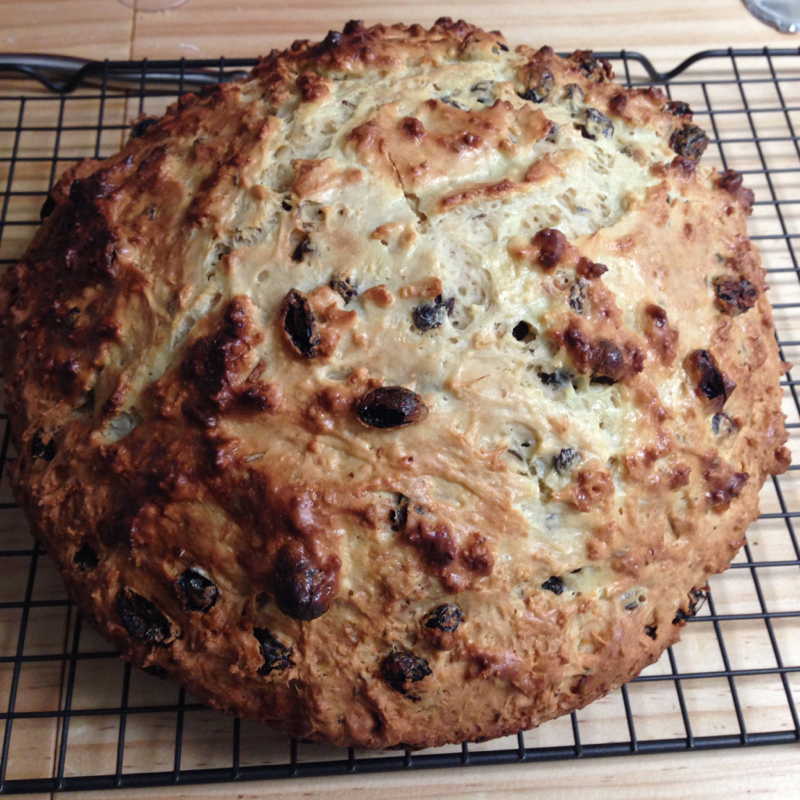
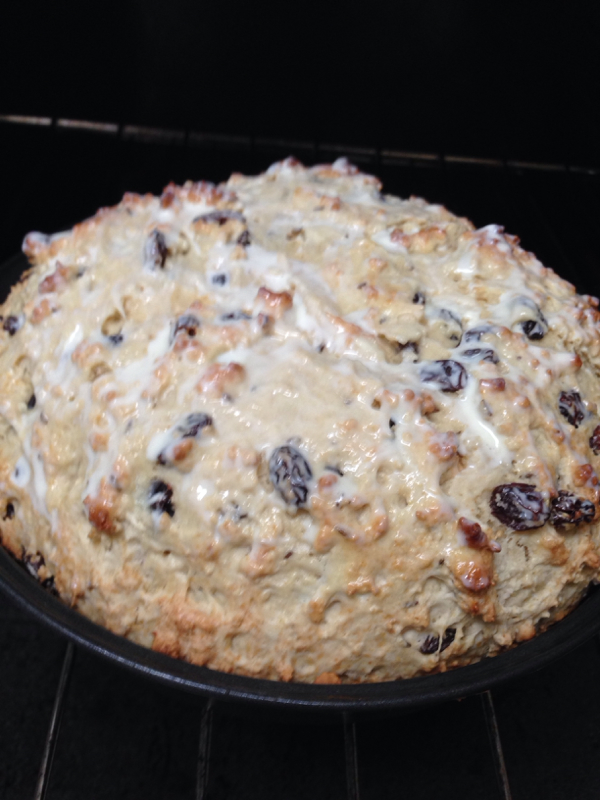
Ingredients: 1/2 cup white sugar 4 cups all-purpose flour 2 teaspoons baking powder 1 teaspoon baking soda 3/4 teaspoon salt 1 1/2 cups raisins 1 tablespoons caraway seeds 2 eggs slightly beaten 1 cup sour cream 1 1/4 cup buttermilk Directions: 1) preheat oven to 350F degrees. Grease a 9" round cake pan. If using a dark cake pan, set oven to 325F 2) In a large mixing bowl, combine all dry ingredients. Including the raisins. 3) In a seperate bowl combine the buttermilk, eggs, and sour cream. Mix together until creamy. 4) pour the liquid into the dry mix and knead well with your hands (about 10-12 strokes). It's very important to only add a little liquid at a time, just so the dough is wet and sticky, it should resemble a loose cookie dough. You will not use all the liquid, keep this! Do not throw this out! 5) put the dough into your cake pan, and bake for about 60 minutes, or until you can insert a knife into the center and remove it cleanly. While baking this brush on the left over buttermilk mixture over the top. It will give it a golden brown color, while making the crust sweet. You can do this a few times while baking. 6) Remove from cake pan and let cool on wire rack. Enjoy! .
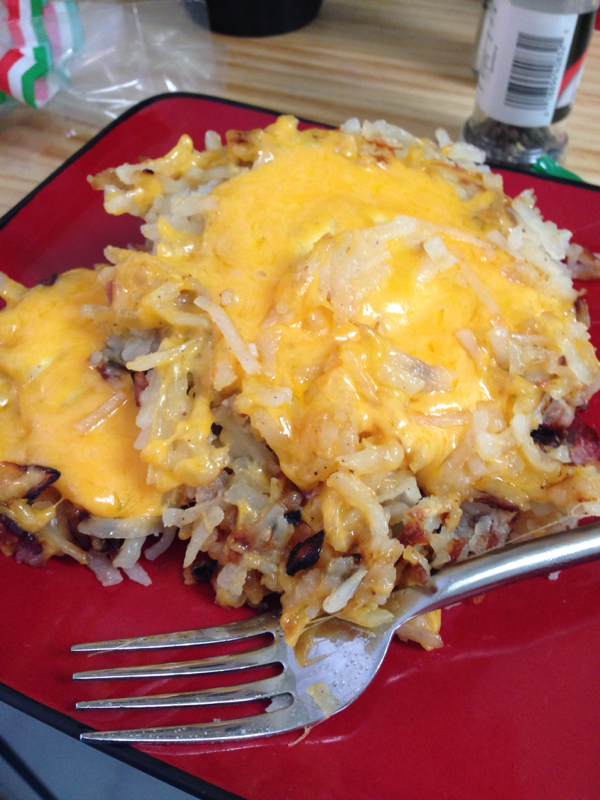
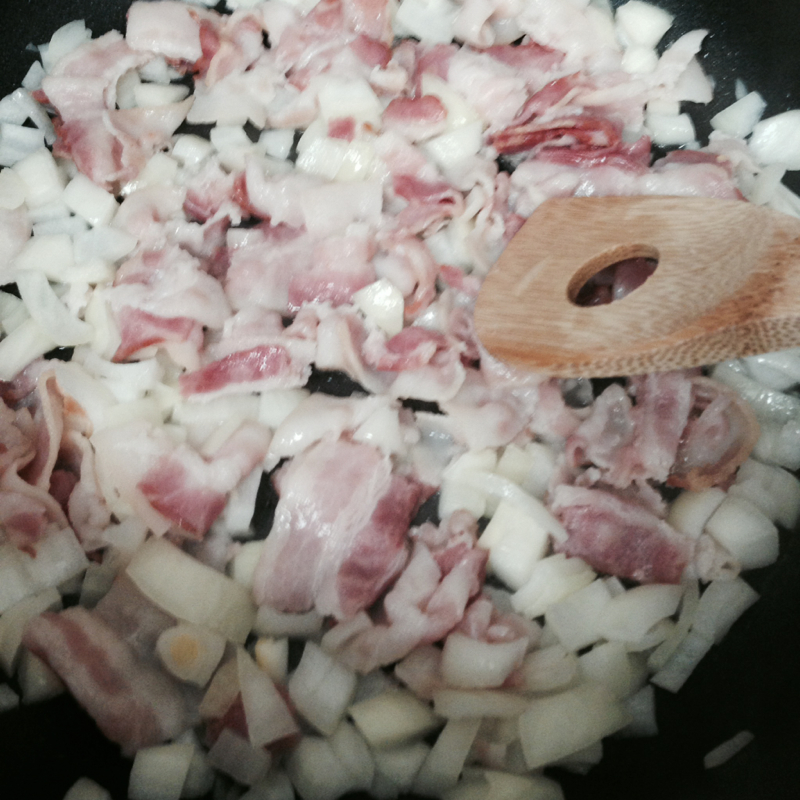
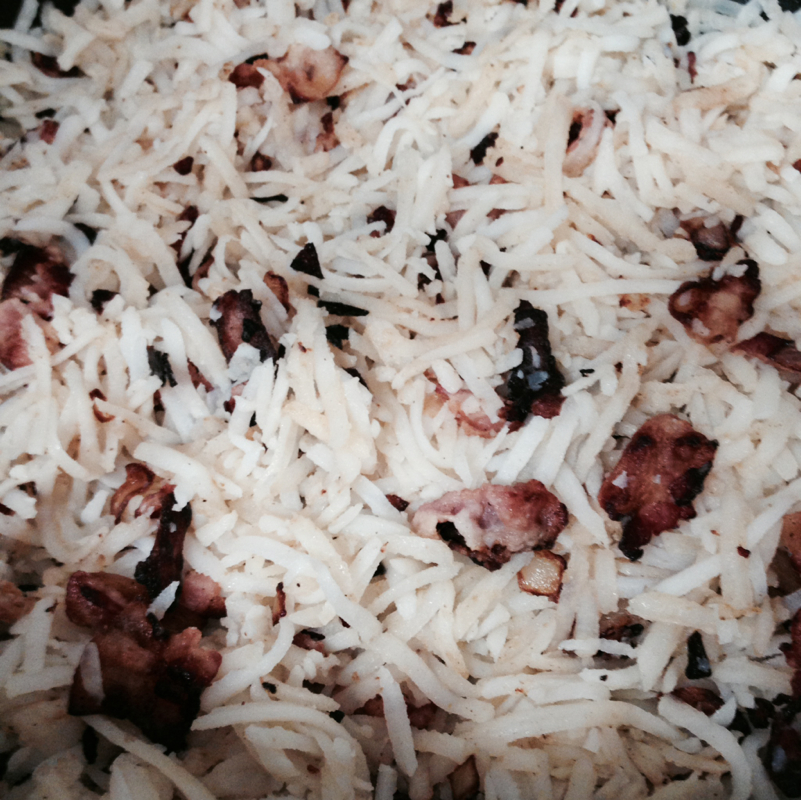
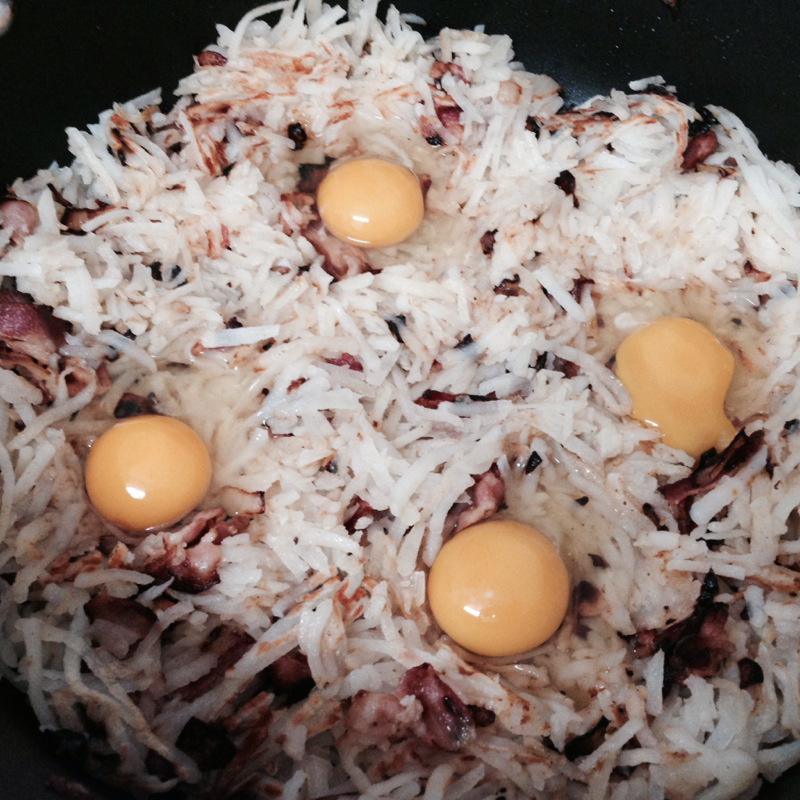
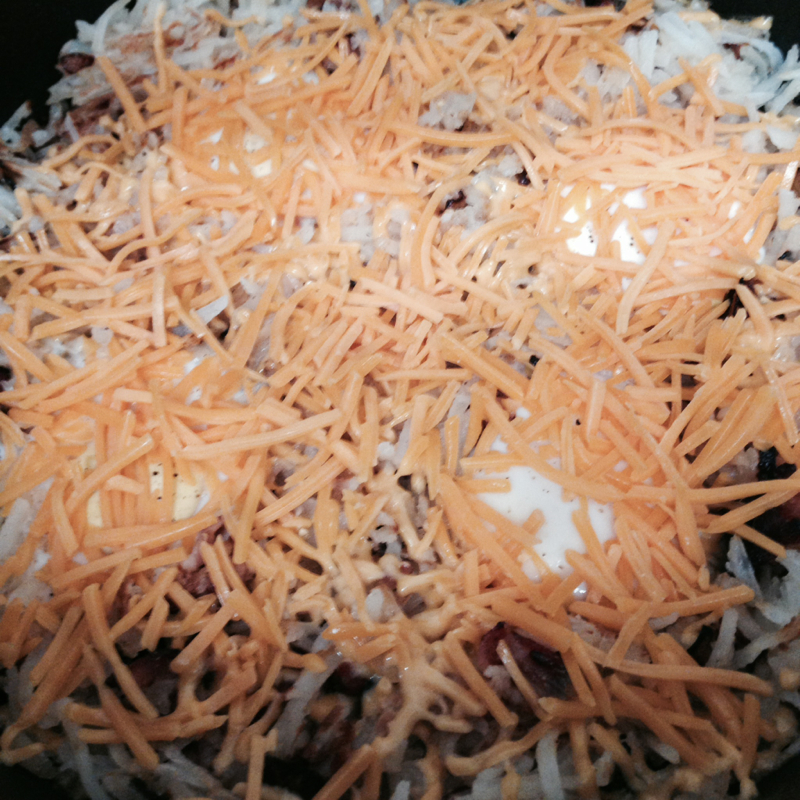
This is perfect for holiday brunches, camping, or if you just don't like doing dishes!!! Super easy! You can't fuck this up people!!! Here's what you need! 4 eggs 1 pkg home fries (thawed completely) -( I used the kind you buy in the refrigerated section) 1 medium Yellow onion 1 8oz package bacon- I like the center cut Salt Pepper Cheddar cheese Instructions!!!!!! 1) cut up that bacon! This part SUCKKS. But suck it up and do it. I find it's easier if you split te package in two and just slice them all at once, into little 1/2" sections. Seperate them and throw them in a Non stick Dutch oven. 2) dice up that onion! The whole darn thing! And don't forget your onion goggles people! Throw that in the pot too! 3) cook the bacon and onion mixture on medium heat until the bacon has been cooked to a nice crunchy crispy god-like creature. 4) once the bacon and onion mixture is good to go, add your package of shredded hashbrowns. Make sure they are thawed completely or they will brown more than you'd like them too! Mix that really well with the bacon and onions. ((DO NOT DRAIN ANY OF THAT BACON GREASE, YOU MONSTER!)). 5) cook that delicious concoction for 10 minutes. On a medium-low heat. 6) using a rounded wooden spatula carefully turn over the potatoes. 7) take a moment to marvel at the yummy creation your making. But not too long this is going to get a 1000% better. 8) make four little nests in your hashbrowns. Make sure not to go all the way down to the pan. The eggs should be sitting on a next of hashbrowns. Build up the sides around your nests, so your eggs can not escape! 9) crack an egg into each nest. 10) add salt and pepper to the egg. 11) put the cover on your pan and let the magic happen, the magic is over once the egg is set. 12) sprinkle as much cheddar cheese as you want on this thing. I used about a cup and a half. Let the cheese melt completely before serving. 13) be prepared for compliments!!
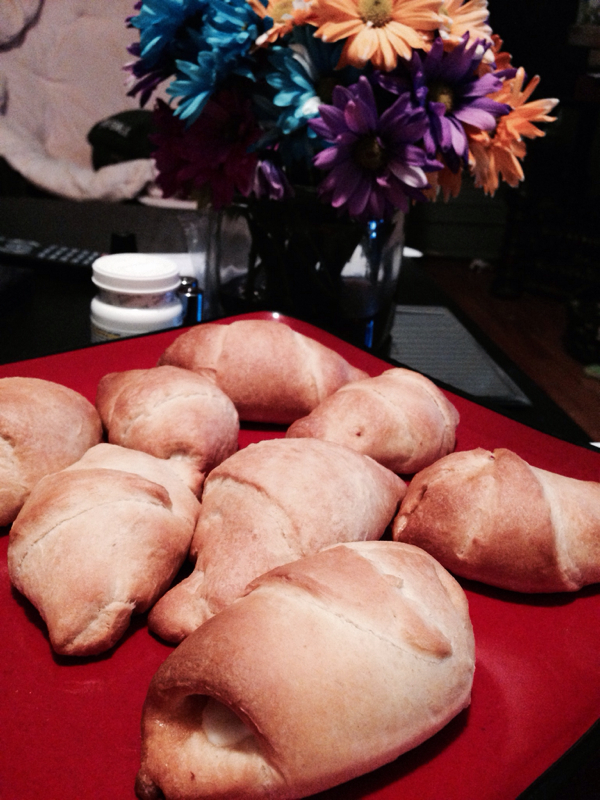
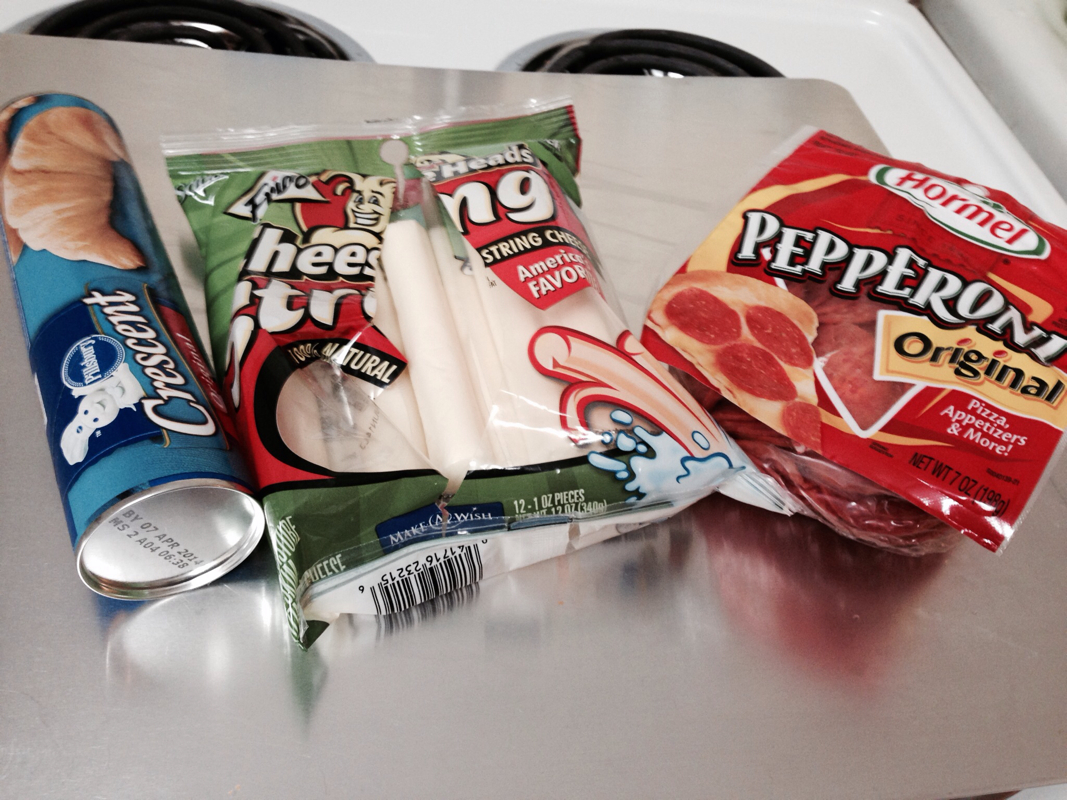
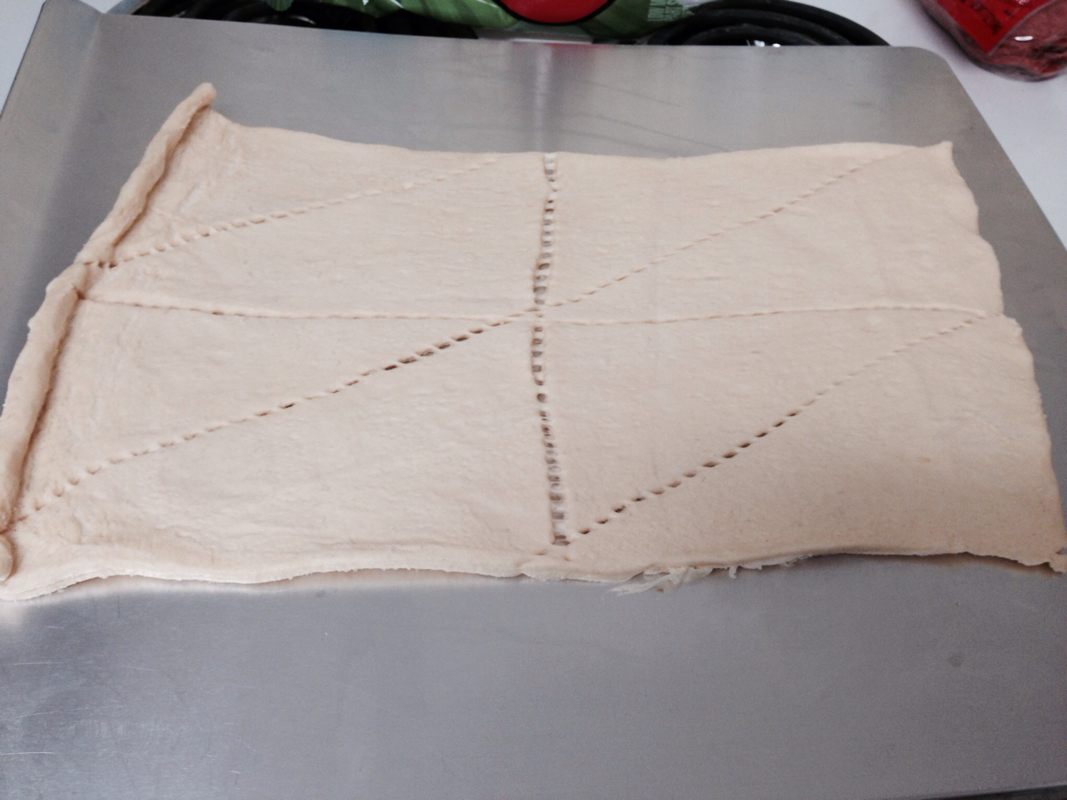
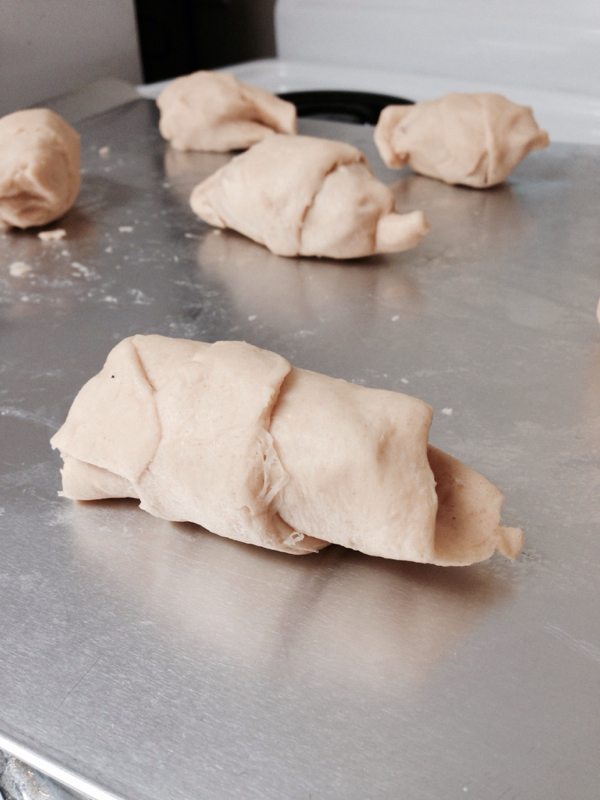
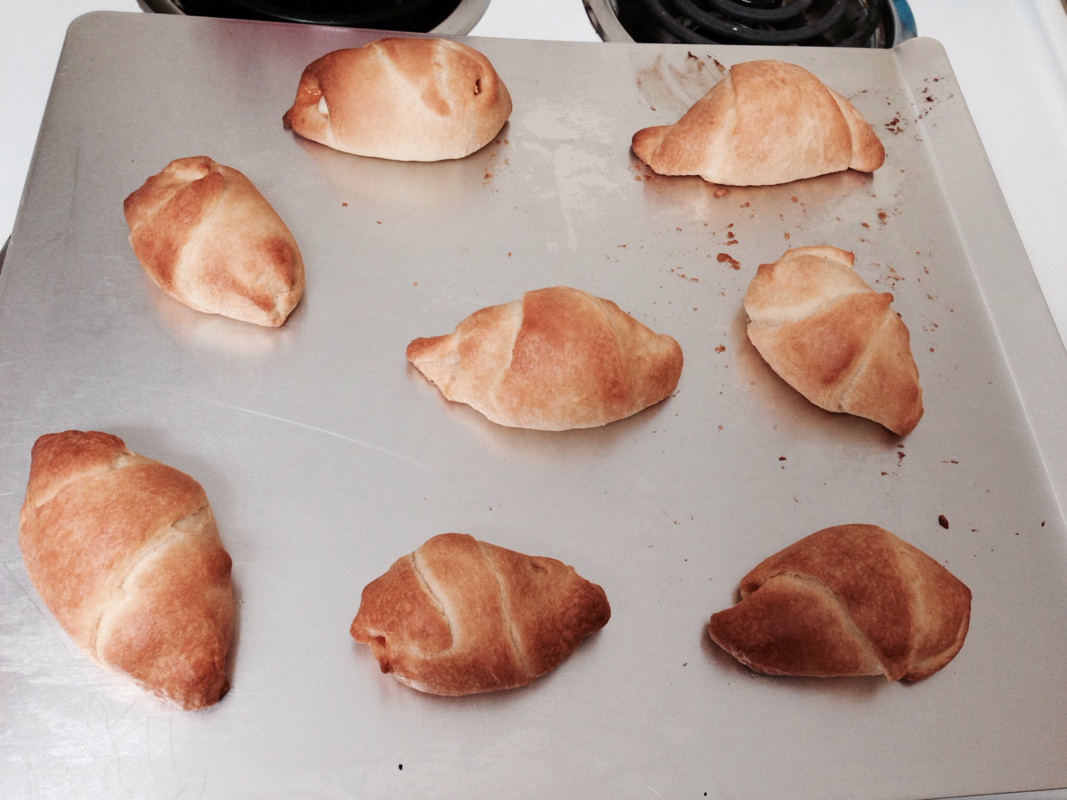
The work day is exaughsting. When you get home you don't want to spend an hour or two cooking. Well most of us at least. This is an easy quick recipe that literally takes 15. Minutes!!! Here's what you'll need! Go ahead and preheat your over to 375F while your preparing these puppies. Now again I use an airbake cookie sheet, if you don't already have one I really recommend them. You will never burn anything ever again! Pop that croissant roll dough right open and roll it out! Seperate all the pieces. Next open a few pieces of mozerella string cheese! Slice them all in half! Next wrap the halved string cheese with a few slices of pepperoni. Place on the larger and of the triangle and start rolling. Just as you would If you were making normal croissants. Pinch the ends closed. Don't worry how awful they look! They'll looks much better after them come out! Bake these for 10 minutes or until golden brown!!! The cheese inside will be melted and so yummy!! Serve with a side of marinara sauce and your good to go! Enjoy!!!
Now tell me that isn't the fanciest damn cupcake you have ever seen--- someone make without any culinary teaching--- in their 1br apt kitchen-- everrrrrrr!! The best part is?! Super easy! Anyone can do it! And it's perfect for valentines day; whether you have someone you can make it for, or just a good old fashion cupcake pick me up- I don't need a guy in my life snack! Here we go!! For the cupcakes: - 1/2 cup white sugar
- 1/2 cup brown sugar
- 3/4 cup + 2 tbsp flour
- 1/4 cup + 2 tbsp cocoa powder
- 3/4 tsp baking soda
- 3/4 tsp baking powder
- 1/4 tsp salt
- 1 egg
- 1/2 cup of milk
- 1/4 cup of canola oil
- 1 tsp vanilla
- 1/2 cup boiling water
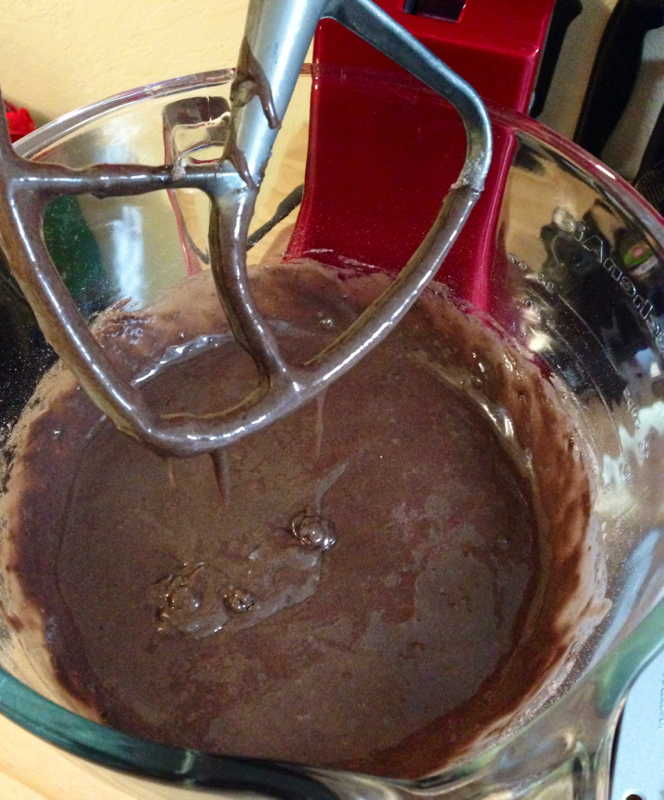
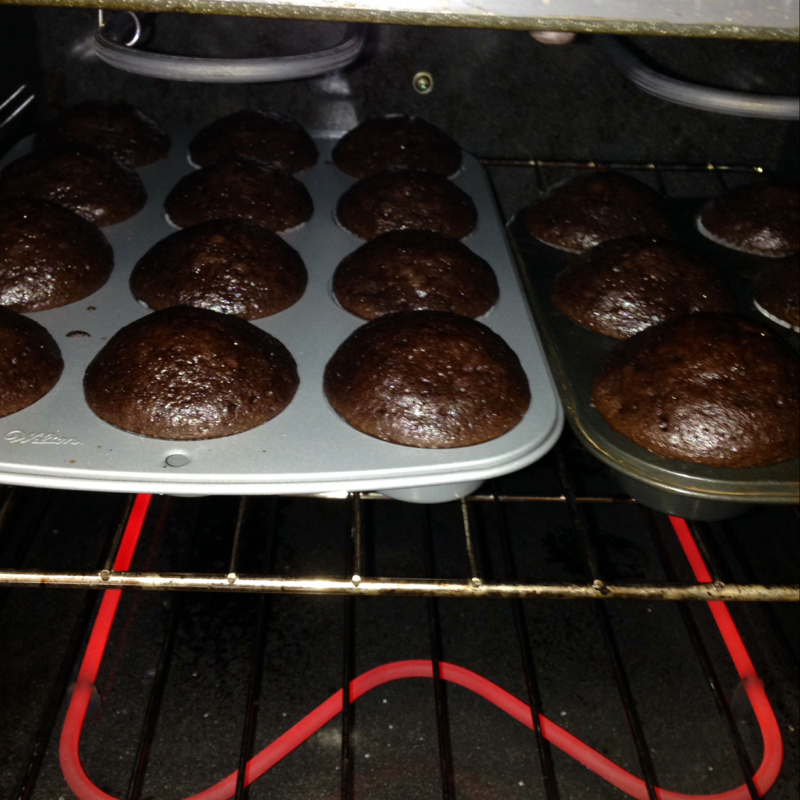
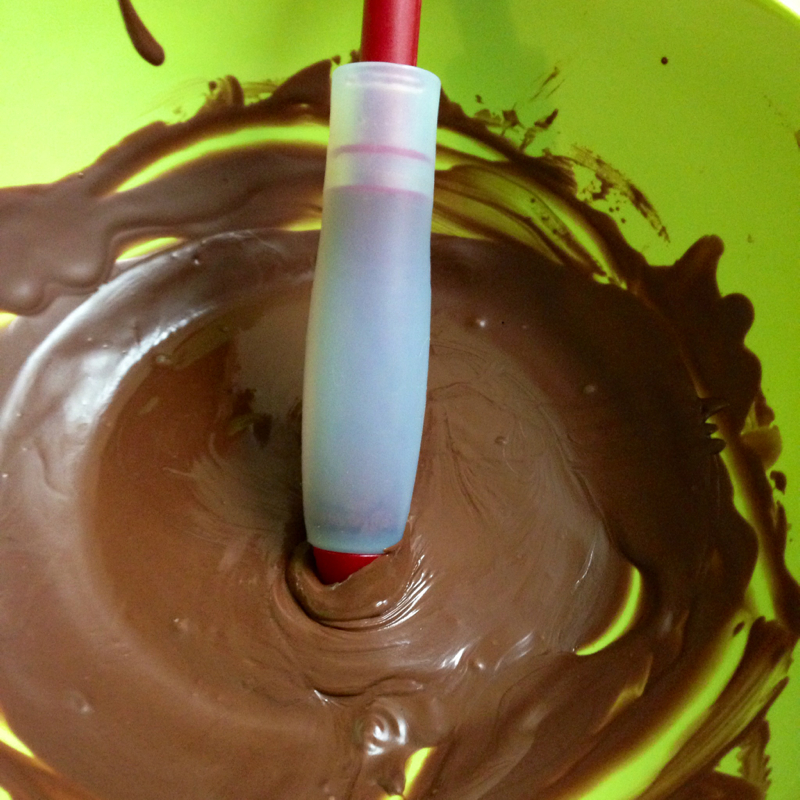
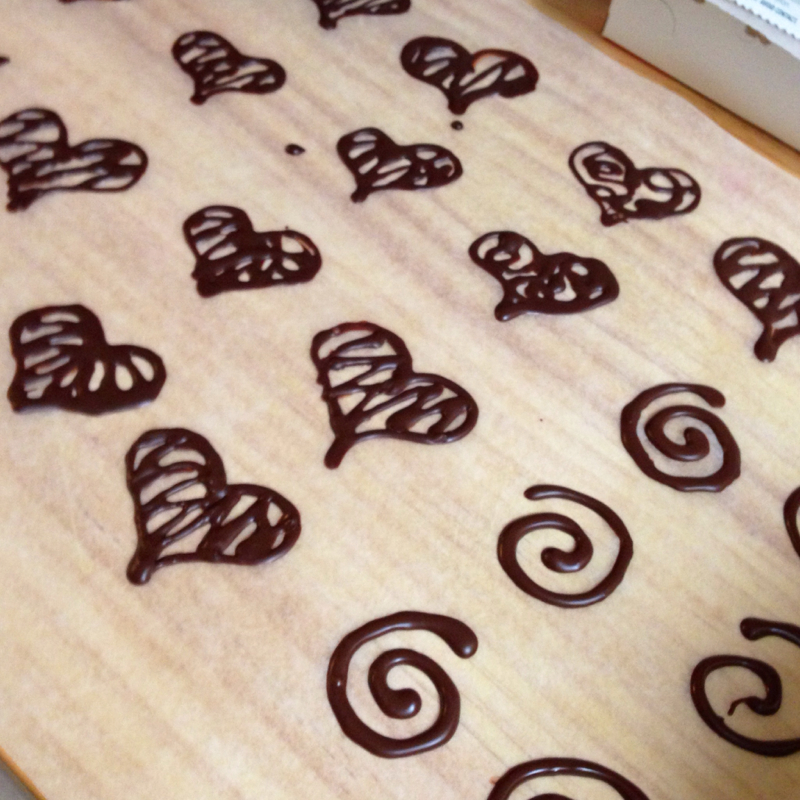
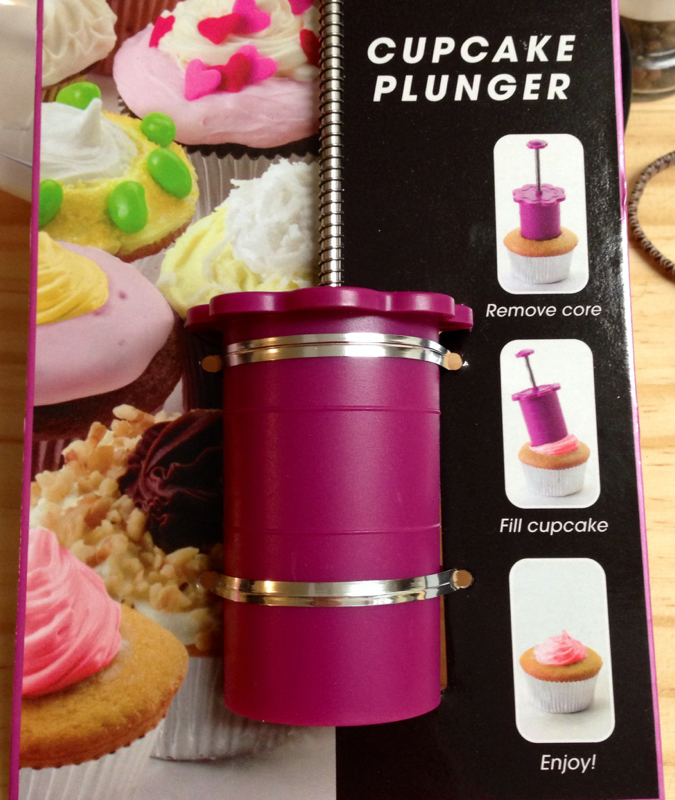
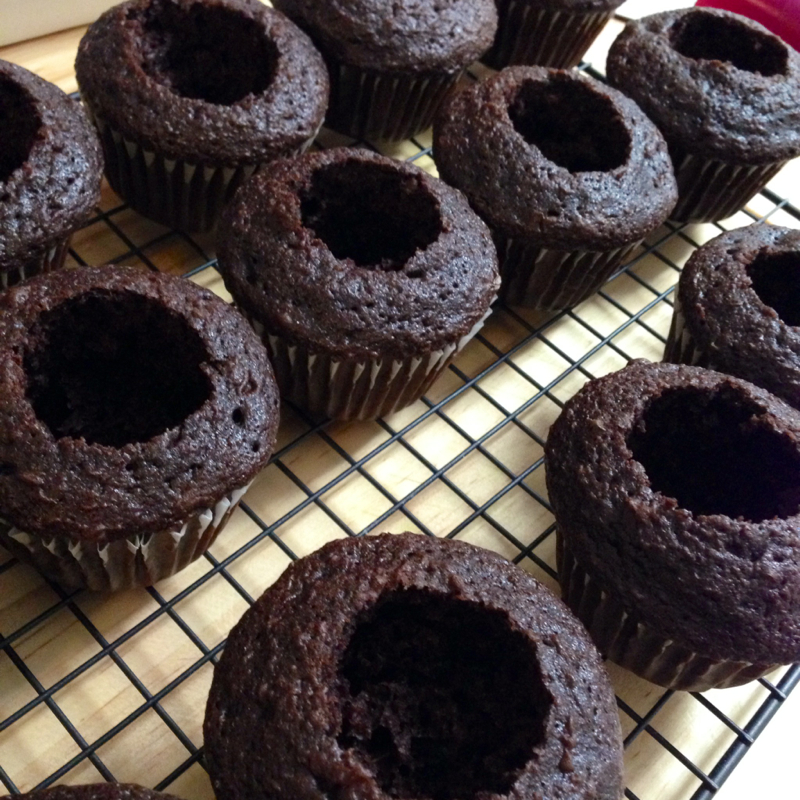
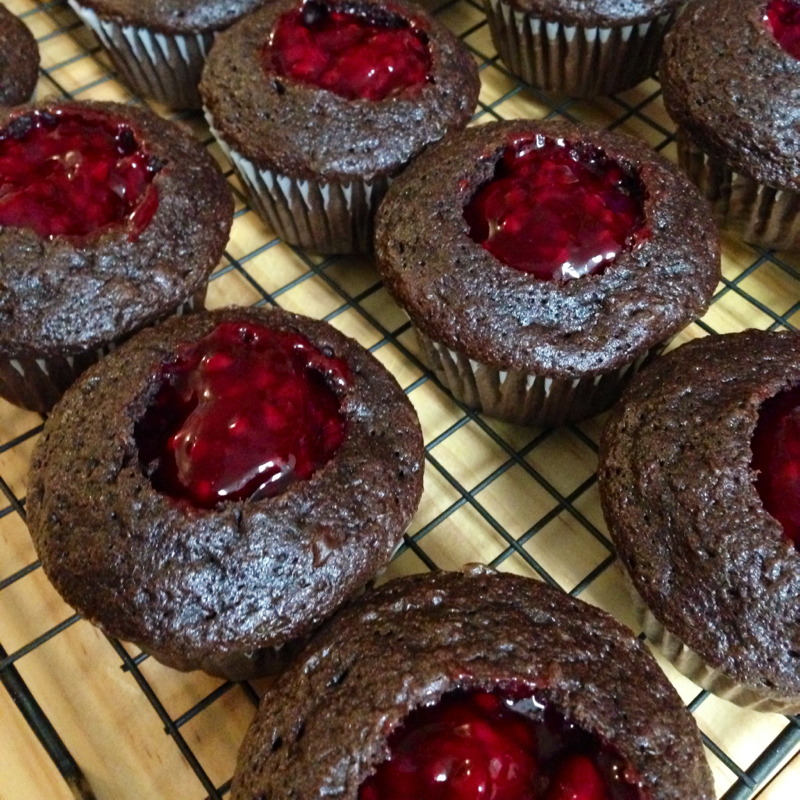
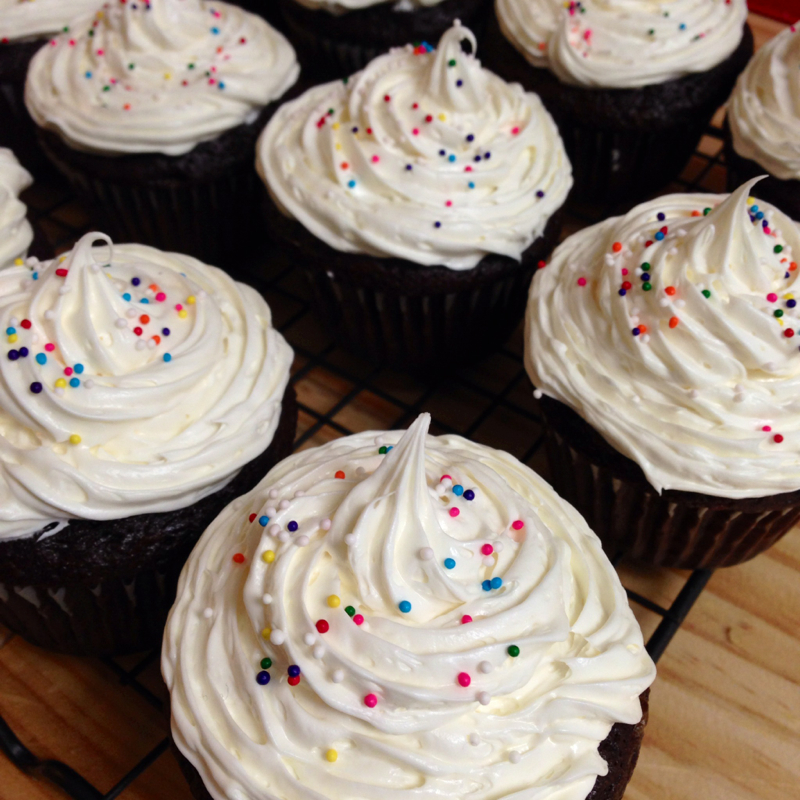
Directions: -- Preheat the oven to 350 degrees. -- Line a muffin tray with cupcake liners. -- Mix together the dry ingredients into a large bowl. -- Add the egg, milk, oil, and vanilla then beat together with a mixer until combined. -- Scrape the sides of your mixing bowl and add the boiling water and mix until just combined. **The mix will be very watery!!!! it's ok!** -- Pour the batter 2/3 of the way full in each cupcake liner. -- Place into the oven and bake for 18-20 minutes or until a toothpick can be inserted into the center and comes out clean! Don't get excited just because they smell delicious and they're out of the oven!! Let those chocolate pieces of heaven cool down before you start the next step!!!! THIS IS IMPORTANT!! 1) you won't burn you little fingers 2) if you try this next part to soon, your going to squish the crap out of your cupcakes. So what do you do while their cooling? Grab your double boiler and set your dark chocolate chips a melting!!! Here's what you need for your dark chocolate accents! Dark chocolate fondue chips (the kind that harden when cooled) A double boiler Wax paper A decorating pen (found this gem at sur la table!) Once your water is boiling add a cupe of chocolate chips- stir constantly until melted into a nice smooth consistency. Lay out a large piece of wax paper. Fill you pen up with the melted chocolate and draw hearts with the pen. ( you can draw really anything here but valentines day and all...) I find them less fragile and prettier if you create zebra lines within the heart, instead of just a solid boring heart. Let this cool! Do not place in the fridge or freezer, the fat it the chocolate seperate a and will looks weird! Now that your cupcakes have cooled, it's time to cut out the holes in the cupcake for your filling!! The easiest way to do this is by purchasing a cupcake corer. I am a fan of gadgets, and this one is amazeballssssss. Press the corer into the center of the cupcake. Go to just under the first line, you do not want your hole to deep, or the cupcakes will fall apart. Twist the corer as your pulling up and then empty the insides into a bowl (Use left overs for a trifle!) by pressing down the plunger! Once that is done, go ahead and fill with your favorite pie filling! I choose raspberry because it has a great taste and color! And it goes well with chocolate! Spoon the filing into each well until it reaches the top. Don't they look yummy?!???!???? I think they do! But wait! There's more! It's time to frost! Now I could wait and make my own frosting, but honestly? Betty Crocker knows what she's doing! Use the vanilla whipped frosting! And frost those puppies!!! Add some rainbow sprinkles for some color!!! Now remember those yummy dark chocolate hearts we made?! They should be ready to go at this point. BE CAREFUL WITH THESE THINGS!!! When I say fragile I mean fragile. The easiest way I found was to pick up the wax paper and slowly bend it away from the chocolate. The accent slowly parts from the wax paper. Carefully pick it up and gently place into the cupcake. Refrigerate for 1 hour. And voila! It's delicious, it looks fancy! And it tastes like a jelly donut and a cake got together and made a baby.
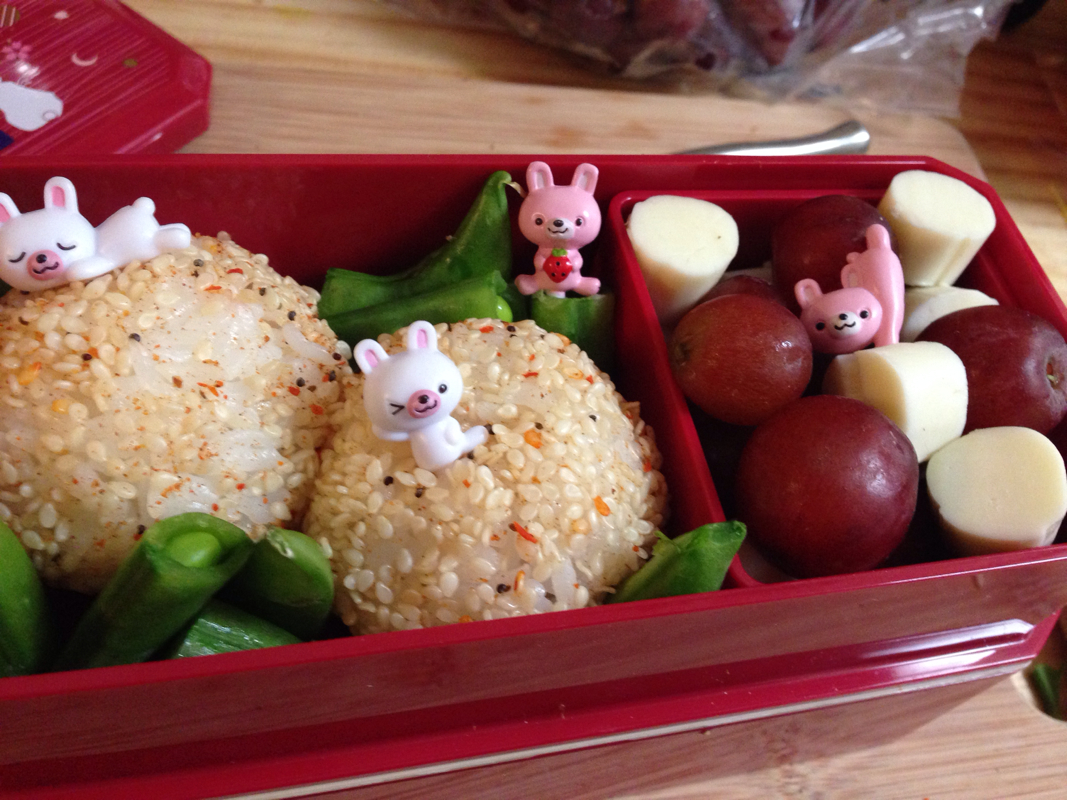
This is an easy to make bento lunch recipe!! And it looks adorable if you love Benito's!!! Ingredients: Sticky rice Sesame seeds Salad supreme seasoning Tuna Mayo Directions: Make yourself some tuna! Add a little less mayo than normal. You don't want it to be to wet, otherwise the rice will absorb it and loose some of its sticky. Cook your sticky rice any way you prefer! It doesn't have to be special for this recipe! In fact I used microwaveable sticky rice for convenience. Once your sticky rice is cooked, lay out a spoonful onto a sheet of cling wrap. Fold the cling wrap over the rice and shape into a ball. It's best to do this while the rice is still hot. Be carful not to burn yourself! Once the rice is rolled into a ball, use your thumb to make a depression into the center of your rice ball. Next fill up that depression with your tuna. Cover the ball with the cling wrap again and start working the rice around it back into a ball until it's completely covered again. Now in a small seperate bowl, add about two table spoons sesame seeds. sprinkle about a half tablespoon of the salad supreme seasoning and mix together. Drop your rice ball in tr bowl and rotate until covered! Add to your bento box, add some decorations, and voila! A perfectly pretty delicious treat for a bento box!! *** great bonus fact! If you like the idea of bento boxes I totally recommend them. The sizes are based on your age and height, in a way to give you the appropriate amount of calories! I use mine to help with a portion control issue and I've lost weight effortlessly!!! *** ENJOY!
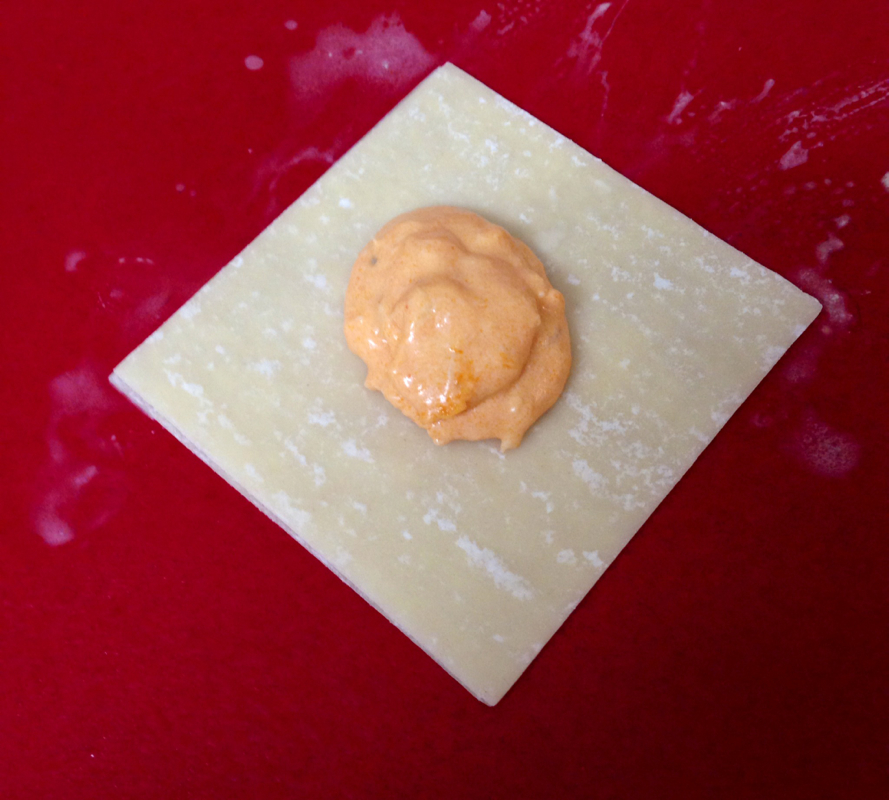
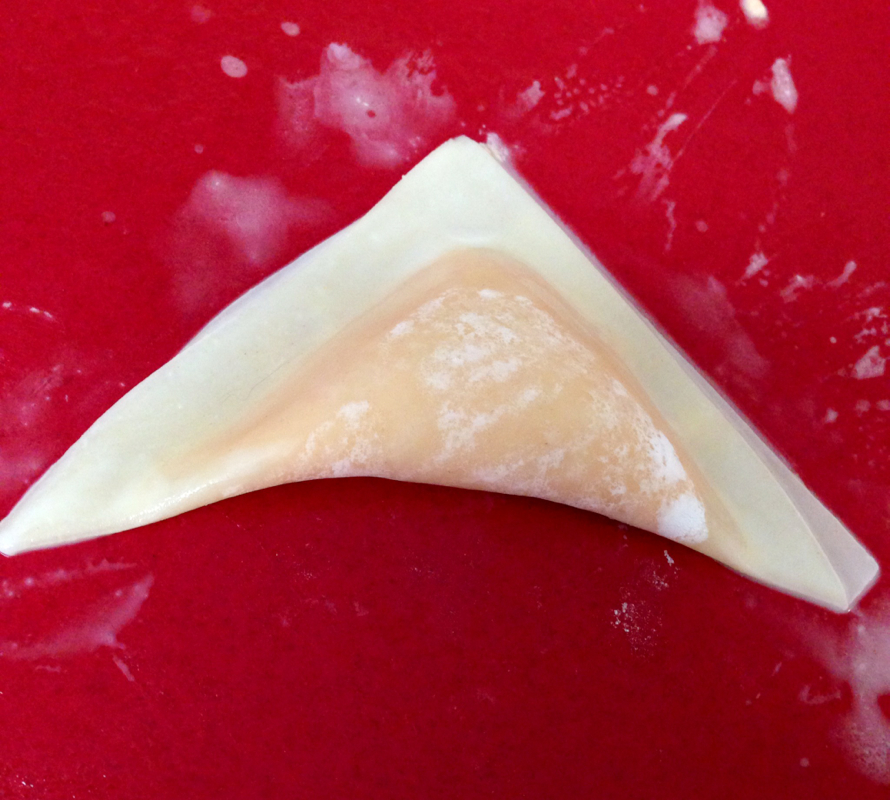
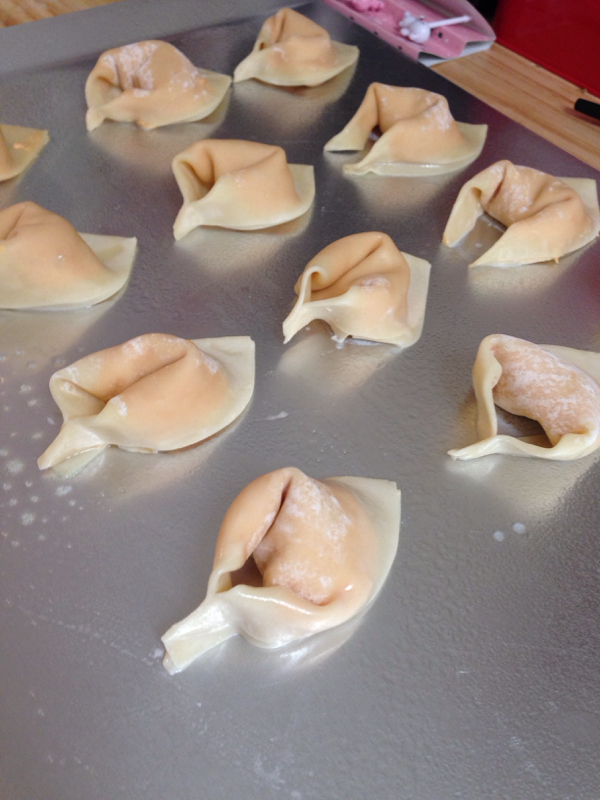
Tonight, I give you my famous buffalo chicken dip, with a twist! And ya know what? It was flippin' fabulous! It's a perfect finger food, and it was less messy than a typical dip! Ingredients: 2 (10 ounce) cans chunk chicken, drained *** you can also used 2 boneless, skinless chicken breast for this recipe boiled and shredded *** 2 (8 ounce) packages cream cheese, softened 1 cup Ranch dressing 1 cup franks buffalo sauce 1 cups shredded Cheddar cheese 1 package of wonton wrappers Directions: In a medium sauce pan add both cans of chunk chicken and franks buffalo sauce. Bring to a simmer and stir. The chicken will start to shred apart by itself. let this simmer on low for 5 minutes. This is my secret! I think the simmering just really gives it that nice kick! Raise the heat back to medium, add the two packages of cream cheese (My advice it to do this one at a time until melted). stir well until combined. Next add the 3/4 cup ranch dressing (you can do blue cheese but I prefer the ranch). Mix well. Then add the shredded cheese. Mix until melted. This is your dip! If you don't want to do rangoons you can now just transfer it to a casserole dish, add a bit more shredded cheese to the top and bake @ 350 until it just starts to bubble ( about 15 minutes). For the ragoons: Pre-heat your oven to 425F. Use a cooking spray and spray down a few cookie sheets. (I really recommend the air bake cookie sheets! Nothing burns!!). Grab a small bowm and fill it with water. You'll be dipping your fingers in the water to seal your rangoon up! Also take a small plate and grease that with your baking spray as well, it will help to prevent any rips in your wonton wrapper! Place one wonton wrapper on the greased plate. Take a spoon and drop a nickel sized portion of dip into the center of the wrapper. Next take your two index fingers and dip them in the water. Run them along the edges of your wrapper. Now take one corner of the wrapper and fold it over to the opposite corner. Re-dip your fingers in the water and run along the two open edges to seal in the dip. Make sure it is sealed! Now you can leave them like this and place them on your greased cookie sheet, or you can get fancy and do what I did by grabbing the two edges of the bottom of your triangle and pulling them down until the join together. Seal it up with some water and pinch! Now I recommend preparing all your cookie sheets in one go! DO NOT WAIT UNTIL ONE IS IN TO START YOUR NEXT TRAY! In time your will get faster, but for now take it slow. It doesn't take that long to cook these. Think ahead! Now that you have all your rangoons ready to go, give them all a quick spray of your baking spray! Go ahead and stick them in the oven, middle rack. For about 5-8 minutes. Keep an eye on them. Once they start to turn brown they're done! Serve on a plate with either some blue cheese or ranch dressings for dipping, and a few pieces of celery don't hurt either, if your like me and like things hot!
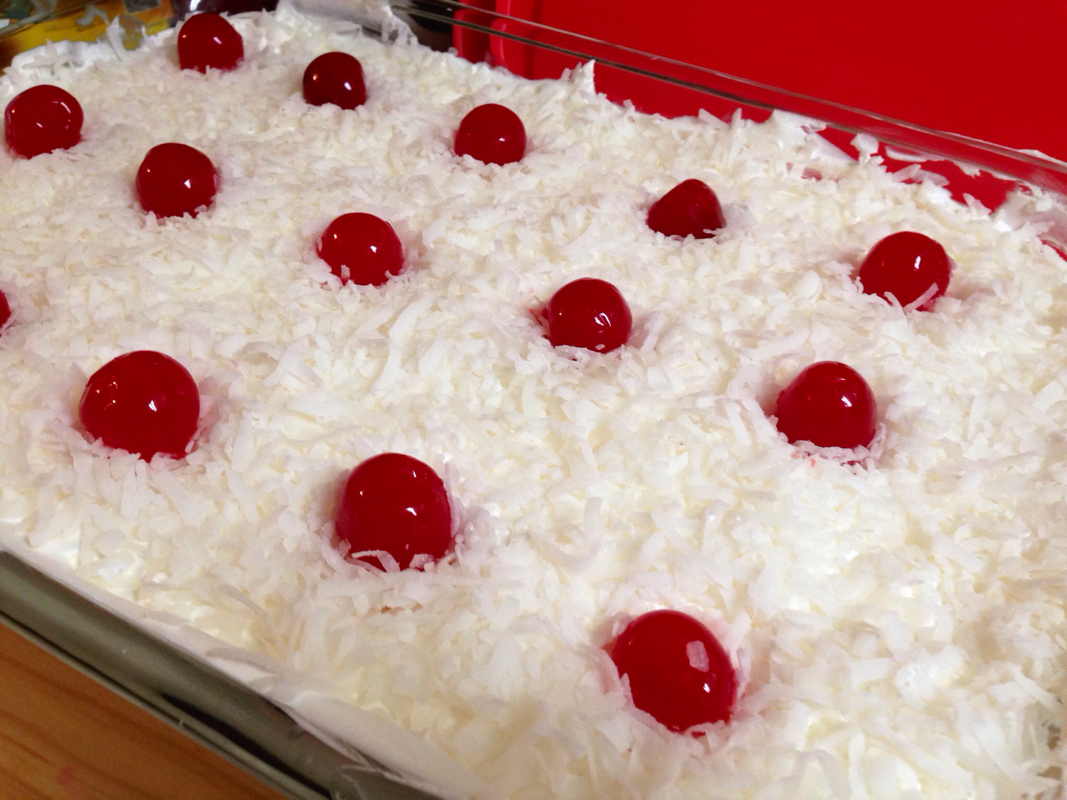
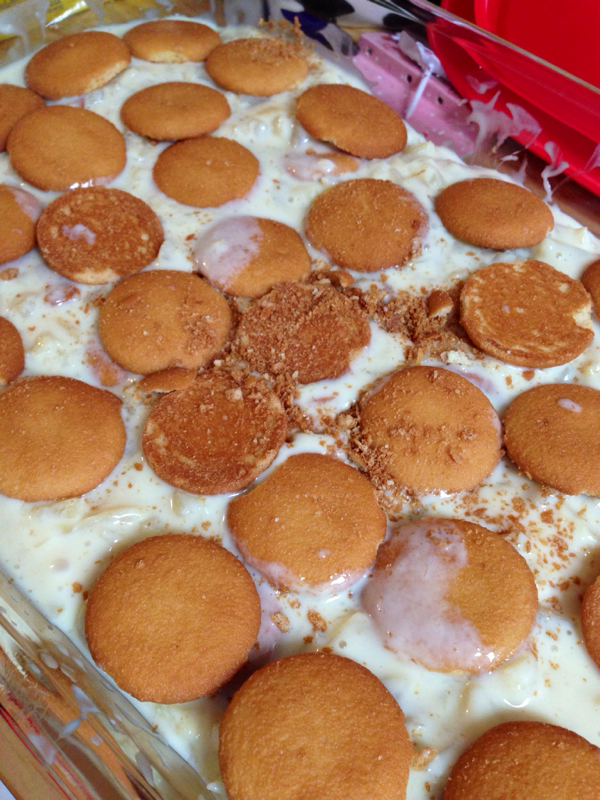
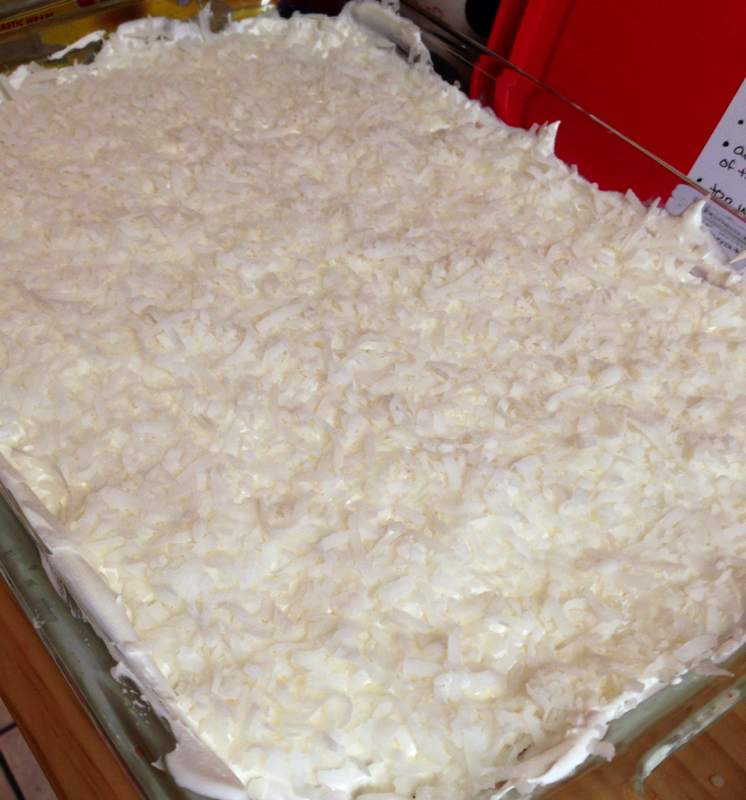
Let me tell you I was skeptical about this one. I am not the biggest fan of no bakes because sometimes the consistency can turn out slimey, and that's gross! This is a different story, despite the gunk you poor into this recipe, it's super yummy. And while in the future I will be trying this with chocolate wafers instead it was really a winner! Here's what you need! 1 13x9" casserole dish 1 20oz can crushed pineapple 1 can sweetened condensed milk 1 box of nilla wafers 1 container of cool whip 1 bag of coconut 1 jar of cherries 1/4 cup lemon juice Directions: 1) layer the bottom of your dish with nilla wafers (It should take about 1/2 the box, save the other half for later), you want them to cover the bottom of your dish completely. 2) in a medium mixing bowl, mix together the 20oz can of crushed pineapple, can of condensed milk, and 1/4 cup of lemon juice. Mix until combined well. 3) pour over your layers of nilla wafers. SLOWLY!!! Your nilla wafers tend to migrate with this step. After you pour it all on just take a knife and move the ones that went on an adventure back to the bottom of the pan. 4) add on a second layer of nilla wafers. It should be the rest of the box at this point. 4) now take that container of whip cream and mix it real well in a warm bowl( I just run my bowl under warm water and dry it). I find it's easier to spread afterwards if you follow that step. Spread the cool whip over the nilla wafers. 5) sprinkle on the coconut until you can't see the whip cream anymore. *if you don't like coconut as much as I do, you can try this with chocolate shavings and I'm sure it would be great!* 6) take your jar of maraschino cherries and place them almost as polka dots in a line. This gives it a nice geometric presentation! And they're yummy! 7) refrigerate this over night of for several hours (at least 6), serve and enjoy!
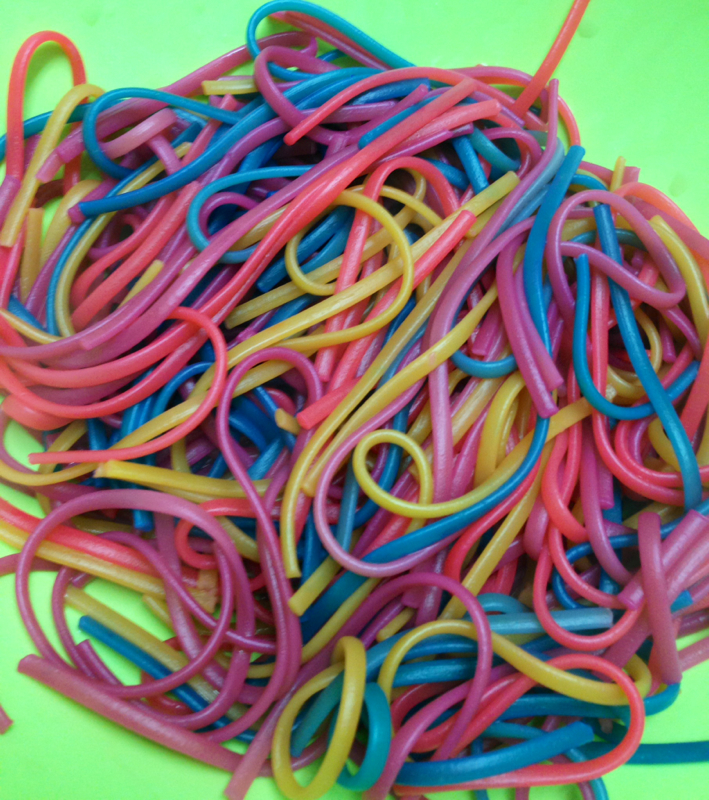
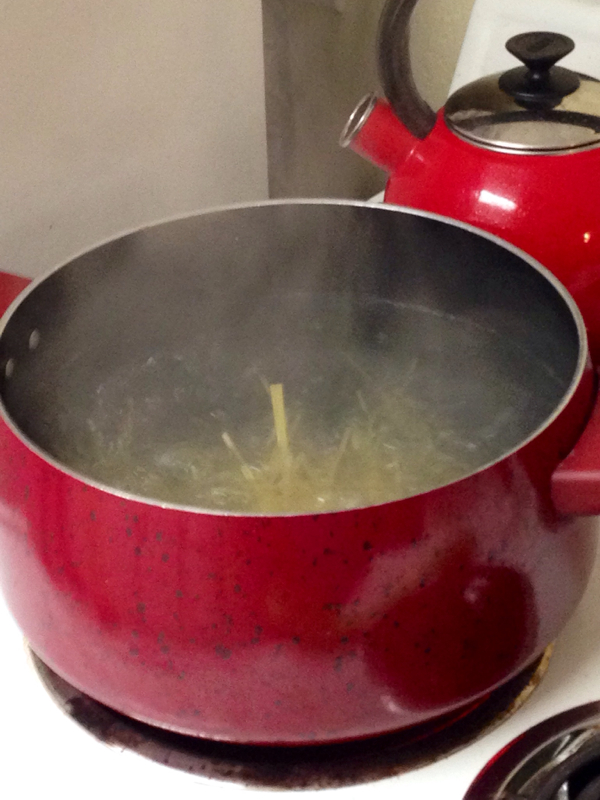
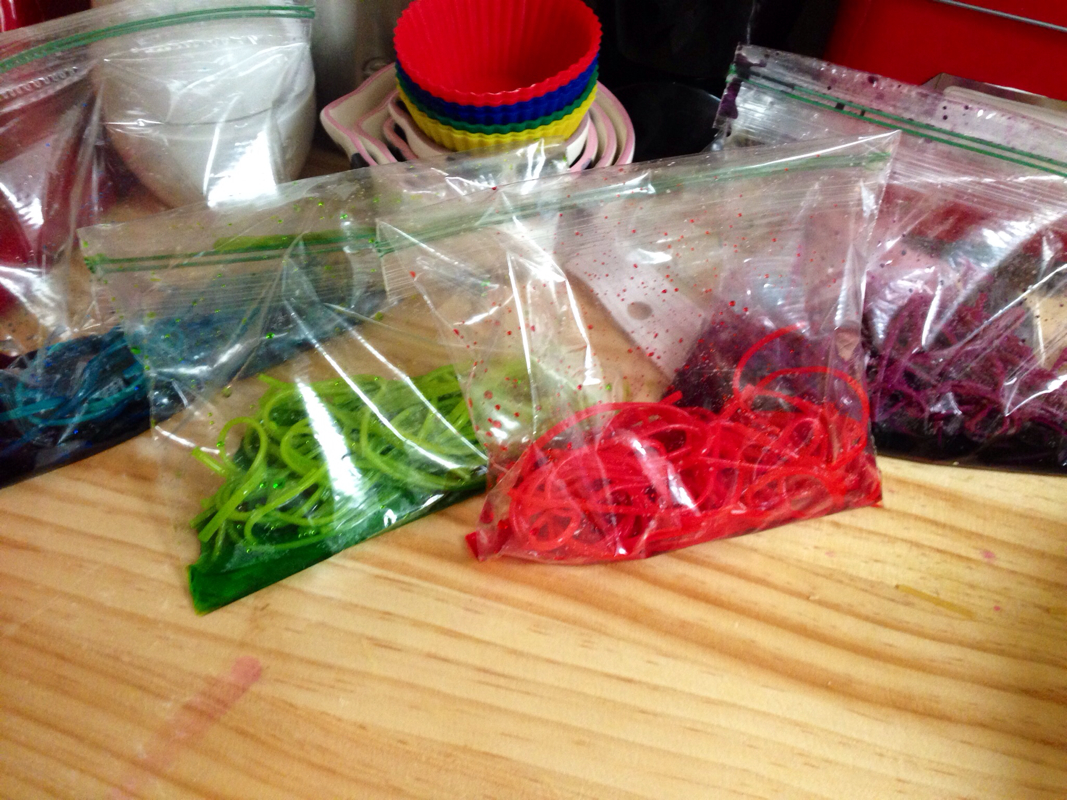
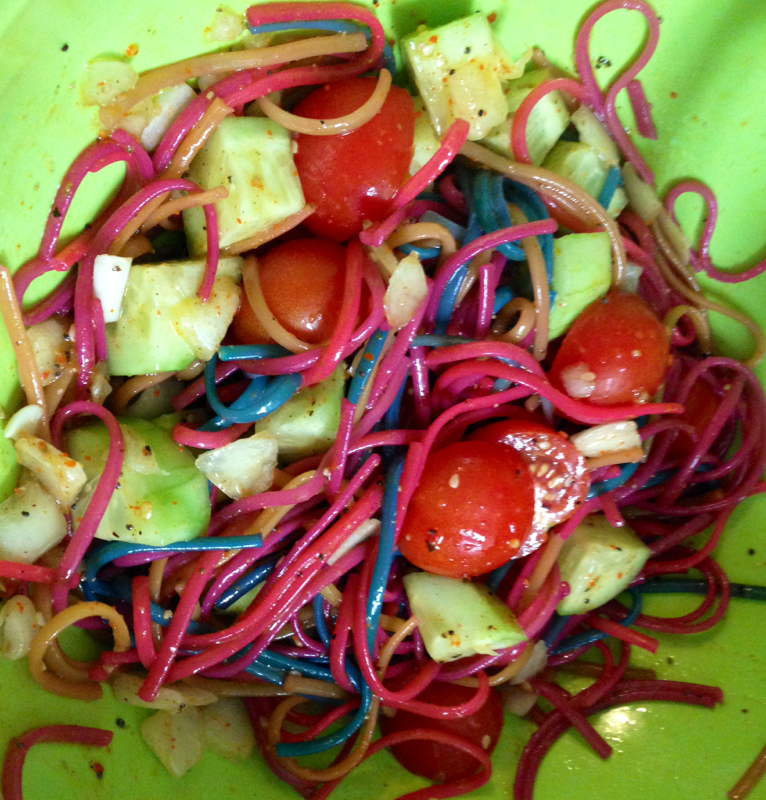
So this Pinterest attempt looked easy enough, and fortunately it was! And if I had some sort of offspring, other than my hell spawn cat, I'd bet they'd be really flippin' excited. Good thing I'm a giant 6 year old anyways. First things first. You do not want to make a whole box of pasta at a time. So this is great if your trying to for portion control (which I completely lack when it comes to pasta!) split the box in half. It's easy enough to make and quick so splitting the box in half isn't an earth shattering annoyance. I promise. Here's what you'll need: 1 cucumber (peeled) A carton of cherry tomatoes Small yellow onion diced Supreme salad seasoning Italian dressing (I like the ken's with the aged Romano in it for a more flavorful taste) 6 ziplock bags Fun food coloring (I used the neon pack and the regular pack for a nice assortment) Water 1) pull out a pot and fill it a little over a half way with water. Add salt to taste and bring to a boil. 2) while your water is attempting to boil. Put 20 drops of food coloring into each ziplock bag. Followed by 2 tbs of water. Make sure you seal those bags up! They tend to roll and I'm not kidding you, it will look like a piñata blew up in your kitchen. For food coloring I used all of the colors in the neon pack, purple, teal, green, and pink. I added the red and the true green from the regular pack. 3) once your water is boiled, add your pasta and follow directions to cook al dente. ( I don't like al dente pasta, so I cooked it where it was just past this but not fully cooked) 4) once the pasta is cooked to al dente throw pasta into a colander and rinse with cold water! This stops the pasta from cooking! Add more water to your pot! Put back on your stove too reduce heat to medium. Water needs to be warm but not boiling! 5) now that your pasta has been run under the cold water, start portioning out the pasta equally into the different ziplock bags and mix in the bag until the pasta and colors are fully combined. Try not to get too excited here like I did! You want to let this sit for a few minutes! 6) now that your pasta has set in the bags for a minute or so, empty the bags out into the colander. rinse with cold water until clear. ** my advice to you is to do one bag at a time. The recipe on Pinterest says to empty them all into your strainer at once but the colors bleed onto each other and you start to get weird looking pasta instead of nice bright colors! ** 7) once all the extra color has been rinsed off the pasta, add back to you pot of warm water for a minute or so to fully cook the pasta. (In here the green dye that was in the neon package will turn a nice yellow, hense the true green) 8) drain pasta, add enough salad dressing to wet the pasta but not to pool at the bottom (you can always add more later) and put Ito te fridge to chill. 9) halve the cherry tomatoes and slice a peeled cucumber into thick slices, then quarter the slices. Dice a yellow onion (you probably only want about 1/8 of a cup for a half lbs of pasta) 10) add veggies to your pasta. This is when you want to add in your salad supreme seasoning. Add to taste. I usually add it until you can see the little orange dots in the seasoning cover the pasta after you've mixed it (about 2 tbs for a full box) I understand this direction is super scientific, you'll understand when you start adding the seasoning! 11) chill and serve!
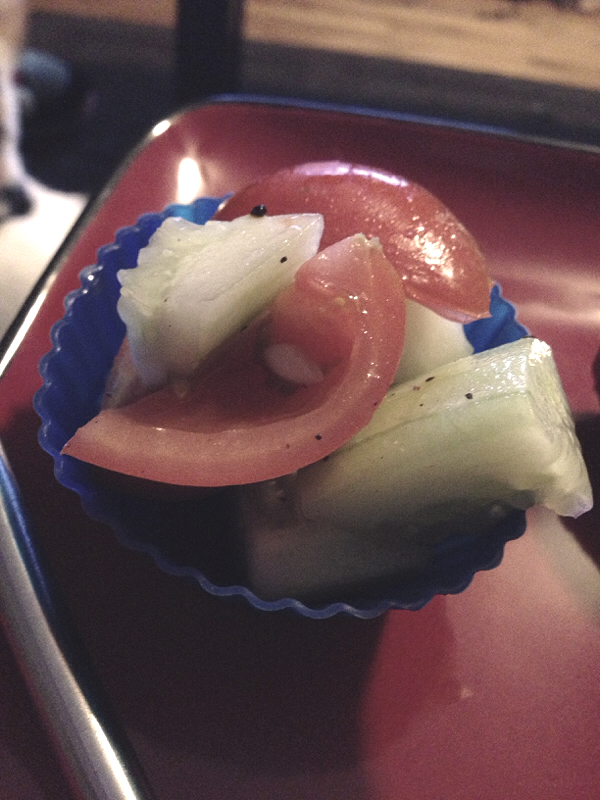
Looking for something quick, healthy, and refreshing to use as a side dish to your moderately *unhealthy* dinner of um... Let's say, bacon wrapped Polish Kalbasa with maple baked beans? Well you've landed yourself in the right place! I'm sorry if this is out there on the interwebs somewhere(I mean everything is on the internet by now right?). It's something I threw together from the ingredients I had in house, and I liked so much, I'm sharing it! Ingredients: Distilled white vinegar 1 cucumber A handful of cherry tomatoes Salt Pepper Directions: Peel the cucumber and cut into thick 1/2" slices. Then quarter the slices. Add to a medium sized bowl. Next quarter your cherry tomatoes. If they're of the small variety, just halve them. Add them to the mixing bowl. Take 3 capfuls of the vinegar and pour it over the top. Add fresh ground pepper and sea salt to taste. Mix and enjoy!
|